
So you’ve got a powerful LangGraph agent, and now you want it to do more than just chat.
You want it to call tools.
Run code.
Pull in live data.
Talk to APIs.
Maybe even send a Slack message or update a Google Sheet.
That’s where MCP (Model Context Protocol) comes in.
This guide walks you through, step by step, how to connect LangGraph agents to real tools using MCP clients and servers. You’ll learn how to:
- Build your own MCP server (in minutes)
- Expose tools like math functions, file search, or calendar events
- Connect to hosted services like Gmail, GitHub, or Trello (via Composio)
- Combine local and remote tools, all in one agent
- Test, debug, and scale your setup with confidence
Whether you’re building a personal assistant, a dev bot, or an enterprise lead generation AI, this setup makes your LangGraph agent not just smarter, but practical.
Let’s get you running in no time 👇
What is MCP, and why use it with LangGraph?
Let’s start with a simple idea.
Imagine if every tool (like a calculator, a file searcher, or even GitHub) came with its own weird-shaped plug. You’d have to write different code for each one just to get your AI agent to talk to it.
Now imagine there’s one universal plug. One clean way to connect all those tools to your agent…like USB-C, but for AI.
That’s MCP.
So… what is MCP?
MCP is a new open standard from Anthropic (released in late 2024) that makes it easy for AI agents (like those built with LangGraph) to interact with external tools and data services. Think calculators, APIs, cloud functions, file systems… whatever you need your agent to use.
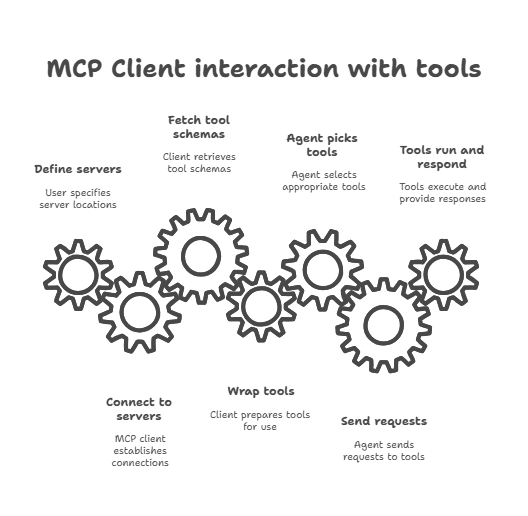
Instead of wiring every tool directly into your codebase, you expose each one through a little server = an MCP server. Your LangGraph agent then connects to it using an MCP client.
It’s like giving your agent a toolbox and the tools know how to talk back.
No more hardcoding integrations or gluing together random APIs. MCP makes it clean, modular, and future-proof.
Why use MCP with LangGraph? Easy!
Using LangGraph with MCP supercharges your agent. Here’s how:
1. Easy tool integration
Want your LangGraph agent to fetch weather data, query a database, or read from a PDF? With MCP, you don’t need to write new logic for each task.
Just:
- Wrap your tool in an MCP server.
- Use the langchain-mcp-adapters package in LangGraph.
- Your agent will discover and call those tools on its own.
No fuss. No glue code. Just plug and go.
2. Modular, scalable setup
Each tool lives in its own little service = a microservice.
You might run:
- A FileLookup MCP server for accessing files.
- A WeatherFetcher for real-time weather.
- A CodeReview service that hooks into GitHub.
Your LangGraph client simply calls them when needed (easiest LangGraph MCP integration). You’re not cramming everything into one agent. You’re building a flexible, scalable architecture for b2b lead generation.
Want to swap out a tool? Restart one without breaking the others? Easy.
3. Structured, secure communication
MCP speaks JSON-RPC 2.0. It’s a clean and well-known protocol: structured, predictable, and designed for request/response flows.
And you can use whatever transport fits your use case:
- HTTP (for web-based services)
- Server-Sent Events (SSE) for streaming
- stdin/stdout for CLI-style tools
It’s standardized but flexible. That means you get security and stability out of the box.
4. Stateful, context-aware agents
Here’s where it gets even cooler.
LangGraph agents using MCP keep track of context automatically. You can call multiple tools in a row, and the agent remembers what happened last. No need to re-explain the conversation.
It’s like giving your agent memory, but without any extra work.
Let’s say you’re building a document assistant. It needs to:
- Search for files on disk
- Summarize content
- Query a custom database
With MCP, you’d:
- Wrap each tool as an MCP server (think about it as LangGraph MCP server integration).
- Point your LangGraph agent (with the MCP client) at those services.
- Let the agent decide what to use, and when.
Your code stays clean. Your agent gets smarter. Your life gets easier.
Make it 10x easier
Imagine your LangGraph bot running lead gen in the background. Generect MCP turns conversations into prospects—automatically.
Got the big picture? Great. Now let’s make sure you’ve got the right tools and setup to get started.
What prerequisites do you need to build an MCP in LangGraph?
Before we jump into setting up the LangGraph MCP Client, let’s make sure you’ve got the basics covered.
No “heavy lifting.” Just a few tools and packages to get you rolling smoothly.
Here is a sneak peek:
| Item | Required? | How to get it | Why you need it |
| Python 3.11+ | ✅ Yes | python.org | MCP adapters require 3.11+ for type safety |
| pip | ✅ Yes | Comes with Python (or install via get-pip.py) | Installs Python packages |
| Virtual environment | ✅ Recommended | python -m venv .venv && source .venv/bin/activate | Keeps dependencies clean and isolated |
| Langchain + LangGraph | ✅ Yes | pip install langchain langgraph | Core framework for the agent |
| MCP adapter | ✅ Yes | pip install langchain-mcp-adapters | Connects agent to MCP tools |
| Optional: openai | 🔲 Optional | pip install openai | Only if using OpenAI models |
Let’s talk details:
1. Get your environment ready
You’ll be working with Python, so make sure your machine is set up right. Here’s what you need:
- Python 3.11 or newer = MCP adapters won’t work on older versions. To check, run: python –version
- Pip = This usually comes with Python. If not, install pip.
- (Recommended but optional) Virtual уnvironment = Keeps things clean and isolated, especially helpful if you’re juggling multiple projects. Set it up like this:
python -m venv .venv
source .venv/bin/activate # On Windows: .venv\Scripts\activate
Why use a virtual environment? You won’t accidentally mess with system-wide packages, and it’s easier to manage dependencies.
2. Install the core packages
Next, let’s install the tools that connect LangGraph with MCP servers.
Run this in your terminal: pip install langchain-mcp-adapters langgraph langchain
These libraries do the heavy lifting. They let LangGraph agents discover and call tools via MCP with almost zero setup.
If you’re planning to use OpenAI or another LLM provider, go ahead and install the client now. For example: pip install openai
You can plug in other providers too. Just make sure your agent knows how to talk to them.
3. Make sure you’ve got an MCP Server
LangGraph needs to connect to at least one MCP-compatible server. That’s where your tools actually live. You’ve got two solid options here:
Option 1: Run a local MCP Server
Perfect for testing or building your own tools.
A great starting point is FastMCP, a Python-based server. You can spin it up like this:
- Install FastMCP (if not already): pip install fastmcp
- Create a tool server, e.g., math_server.py. Inside, you might define a simple math function your agent can call.
- 3. Run the server: python math_server.py
Now it’s live and listening for your agent to call it.
Option 2: Use a hosted MCP Server
Maybe someone else is hosting the tools for you or you’re using a cloud-based setup.
In that case:
- Get the server’s URL.
- Note any headers or API keys it requires.
- Make sure it’s up and reachable from your machine.
LangGraph can connect to either option. Just tell it where to look.
Once your environment is ready, it’s time to build your first MCP server. Let’s create a simple tool your agent can actually use.
How can you build a basic MCP server?
So, you’re ready to create your own tool service? Great! With FastMCP, it’s surprisingly simple; you’ll have a working server in just a few lines of code.
Before we dive into specifics, let’s quickly break down what each part of a basic MCP server does. This table shows you exactly how to write, register, and run a tool…without the guesswork.
| Step | What you do | Why it matters |
| @mcp.tool() | Decorate a function | Marks it as a callable tool for the client |
| Type hints | Add types like a: int and -> int | Enables automatic schema generation |
| Docstring | Write a 1-line description | Helps agents understand tool behavior |
| FastMCP(“Name”) | Create a named server | Registers your toolset under that name |
| mcp.run() | Start the server | Opens the tool to clients (via stdio or HTTP) |
Let’s walk through how to build a basic LangGraph MCP server step by step. You’ll define your tools, set up the server, and make it callable by any LangGraph agent.
Step 1: Install and set up FastMCP
First, you’ll need to install FastMCP = the easiest way to spin up an MCP-compatible server.
In your terminal, run: pip install fastmcp
Now, open a new Python file (let’s call it server.py) and add the following:
from mcp.server.fastmcp import FastMCP
mcp = FastMCP(“DemoServer”)
This creates a new server named “DemoServer” that’s ready to register tools and listen for incoming calls. FastMCP takes care of all the background plumbing (no boilerplate needed!).
Step 2: Define your tools
Your tools are just regular Python functions. To expose them to your agent, use the @mcp.tool() decorator.
Each tool should:
- Have type hints (so MCP can generate the interface)
- Include a simple docstring (so humans + agents know what it does)
Here’s a quick example:
@mcp.tool()
def add(a: int, b: int) -> int:
“””Add two numbers.”””
return a + b
@mcp.tool()
def shout(s: str) -> str:
“””Convert a string to uppercase.”””
return s.upper()
That’s it. Just decorate and define. FastMCP will handle schema generation, validation, and everything in between.
You can create tools for anything: file handling, database queries, web scraping…you name it.
Step 3: Choose your transport
Next, decide how your server should talk to clients (like LangGraph):
- stdio (default) → great for local development or CLI use.
- http / streamable-http → best for running in the cloud or on a network.
- sse → was used before, but http is now the better choice.
You don’t need to write separate code for each transport; just pass a flag when starting the server.
Step 4: Launch your server
Ready to go live? Just wrap it all up with a call to .run():
if __name__ == “__main__”:
# Default: stdio
mcp.run()
# Or run over HTTP:
# mcp.run(transport=”http”, host=”0.0.0.0″, port=8000)
Then launch your server from the terminal: python server.py
Or, if you prefer using the CLI: fastmcp run server.py –transport http –port 8000
FastMCP takes care of everything else: starting the listener, exposing the tools, and speaking the MCP protocol.
Aaaaand…you’ve got a live MCP Server!
By now, your server:
- Has a name (DemoServer)
- Offers tools (add(), shout(), or any you define)
- Runs with a clean transport setup
LangGraph can now discover and call those tools, just like it would any other service.
Now that you’ve built a tool, your LangGraph server needs to expose it. Let’s turn on the MCP endpoint so everything can talk.
How do you enable the MCP endpoint on the LangGraph server?
You’re almost there = your tools are ready, your server’s built.
Now it’s time to let your LangGraph agents speak MCP. The good news? LangGraph makes this part super simple. No extra plugins. No config overload.
Let’s walk through how to activate the MCP endpoint on your LangGraph server.
Step 1: Upgrade your LangGraph packages
To use MCP, your LangGraph installation needs to be on the right versions. These versions include built-in LangGraph MCP support.
In your terminal, run: pip install “langgraph-api>=0.2.3” “langgraph-sdk>=0.1.61”
This ensures your server will expose the MCP interface when it runs. If you’ve used LangGraph before, this upgrade is key. Older versions don’t support MCP tools.
Step 2: Start (or redeploy) your server
Now that everything’s up to date, just start your LangGraph server like you normally would: langgraph-api start
Or use whatever deployment method you prefer: Docker, CLI, or your cloud setup. There’s nothing extra to configure. The MCP endpoint is enabled automatically in the background.
No flags. No feature toggles.
It just works.
Step 3: Access the MCP endpoint
Once the server’s running, your agent is available via this URL: http://<your-server-host>/mcp
This is the official MCP endpoint. It uses streamable HTTP transport, which means MCP clients (like those built with langchain-mcp-adapters) can connect to it right away.
You can open that URL in a browser or curl it to see that it’s alive.
What happens behind the scenes? As soon as your server spins up:
- LangGraph registers all deployed agents as MCP-compatible tools.
- Those agents are exposed via the /mcp endpoint.
- MCP clients can discover and interact with them instantly.
You don’t need to write schemas or define routes manually. LangGraph handles that part.
All your client needs is the /mcp URL. From there, it can list your agents, send requests, and receive structured responses = just like it would with any other MCP tool.
Your server’s ready! Now it’s time to connect the client. Let’s plug everything in and make your agent MCP-aware.
How can you connect your clients to the MCP Server?
Now that your MCP servers and LangGraph agents are ready, it’s time to bring everything together. This is where the MCP client comes in. It connects your app (or agent) to the tools running on those servers, so your agent can use them like magic.
Let’s go through how to write a client in both Python and JavaScript/TypeScript.
How do you write a client in Python?
You’re just a few lines away from having a LangGraph agent that can talk to MCP tools. Here’s the flow:
Here’s how to make it happen.
1. Import the MCP Client
First, bring in the client class that handles multiple servers: from langchain_mcp_adapters.client import MultiServerMCPClient
This client makes it easy to talk to local or remote MCP servers, using different transports like stdio and http.
2. Configure the servers you want to connect to
You can use:
- A local tool running via script (stdio)
- A hosted tool with a live HTTP endpoint
Here’s how to set them up in one go:
client = MultiServerMCPClient({
“math”: {
“command”: “python”,
“args”: [“/path/to/math_server.py”],
“transport”: “stdio”,
},
“weather”: {
“url”: “http://localhost:8000/mcp”,
“transport”: “streamable_http”,
}
})
This config tells your client how to connect to each server. You can mix and match local and hosted tools.
3. Load the available tools
Now pull in the tools from those servers. They’ll be automatically wrapped for LangGraph: tools = await client.get_tools()
Behind the scenes, this fetches tool schemas, validates inputs, and sets everything up for your agent to use (no extra work needed).
4. Build a LangGraph agent
With your tools ready, wire them into a React-style LangGraph agent:
from langgraph.prebuilt import create_react_agent
agent = create_react_agent(“anthropic:claude-3-7-sonnet-latest”, tools)
This kind of agent can decide which tool to use, when to use it, and how to call it, all based on the user’s input.
Want to see what happens when your agent runs? Here’s the basic flow:
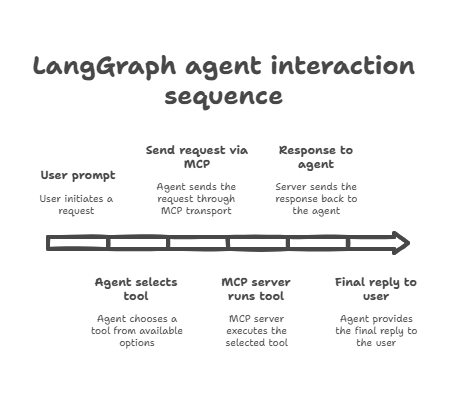
5. Ask questions, get answers
Let’s test it out. You can now query your agent and it’ll decide whether to use a tool:
math_resp = await agent.ainvoke({
“messages”: [{“role”: “user”, “content”: “what’s (3 + 5) x 12?”}]
})
weather_resp = await agent.ainvoke({
“messages”: [{“role”: “user”, “content”: “what is the weather in nyc?”}]
})
That’s it. Your agent figures out the intent, picks the right tool, and gets the result = all on its own.
What you’ve built:
- A client connected to one or more MCP servers
- Tools dynamically discovered and wrapped
- A LangGraph agent that uses those tools in real conversations
You’ve just unlocked real-world utility in your AI agent. Let’s see how to do the same in JavaScript!
How do you write a client in JavaScript/TypeScript?
Working in a JS or TS project? You can do all the same things, right from your Node.js environment.
Here’s how to set up the MCP client and run a LangGraph-compatible agent.
1. Install the SDK and Adapters
First, add the required packages: npm install @modelcontextprotocol/sdk @langchain/mcp-adapters
This gives you everything you need: the MCP client, adapters, and transport support.
2. Connect to your MCP Server
Use the SDK to create a client and attach it to an HTTP endpoint:
import { Client } from “@modelcontextprotocol/sdk/client/index.js”;
import { StreamableHTTPClientTransport } from “@modelcontextprotocol/sdk/client/streamableHttp.js”;
async function connectClient(url: string) {
const client = new Client({ name: “js-mcp-client”, version: “1.0.0” });
const transport = new StreamableHTTPClientTransport(new URL(url));
await client.connect(transport);
return client;
}
const client = await connectClient(“http://localhost:2024/mcp”);
console.log(“Tools:”, await client.listTools());
.listTools() will return everything your server offers: math tools, file tools, whatever’s live.
3. Load tools into a React agent
Now wire your tools into a LangGraph or LangChain agent:
import { loadMcpTools } from “@langchain/mcp-adapters”;
import { createReactAgent } from “@langchain/langgraph/prebuilt”;
import { ChatOpenAI } from “@langchain/openai”;
const tools = await loadMcpTools(“mcp-server”, client);
const agent = createReactAgent({
llm: new ChatOpenAI({ model: “gpt-4o-mini” }),
tools,
});
Once you do this, your JS agent can reason about which tool to use, just like in Python.
4. Run the agent and get answers
Try asking it something in code:
const res = await agent.invoke({
input: “What is the result of 7 + 13?”,
});
console.log(res.output);
Want to go interactive? You can run a CLI loop too:
const input = await prompt(“Ask me anything: “);
const response = await agent.invoke({ input });
console.log(response.output);
Simple as that.
Want to do more than just local tools? Let’s see how to add hosted and third-party MCP servers…no extra code needed. Yet, a tiny pause along the way…
Turn every agent into a Sales Rep
Combine Slack, Gmail…and Generect MCP. Now your agent doesn’t just work—it grows your pipeline.
How can you integrate custom or hosted servers?
At this point, you’ve built your own LangGraph MCP server and connected a LangGraph client to it. Awesome. Now, let’s take it up a notch by plugging in hosted or third-party MCP servers.
No matter if it’s your own API or a fully managed tool suite like Composio, you can integrate everything into a single MCP client config.
Here’s a quick comparison of self-hosted vs managed MCP servers to help you decide what to use in production.
| Aspect | Self-hosted MCP | Managed MCP (e.g. Composio) |
| Setup time | Fast (local), Medium (remote deployment) | Instant, just register and plug in |
| Maintenance | You maintain availability, auth, scaling | Fully managed by provider |
| Tool control | Full control over logic, structure | Prebuilt tools with fixed schemas |
| Authentication | Up to you = can be basic or advanced | Built-in OAuth, API keys, etc. |
| Ideal use case | Custom/internal tools | SaaS automation (Slack, Gmail, GitHub, etc.) |
Let’s walk through how.
Option 1: Use Composio-managed MCP Servers
If you don’t want to host or maintain servers yourself, Composio makes it easy. They offer plug-and-play access to over 250 tools, including Gmail, Slack, Trello, GitHub, Notion, databases…you name it.
Here’s how to add it to your MCP client:
- Sign up at composio.dev
- Grab your MCP endpoint URL = they’ll give you a streamable HTTP or SSE link
- Add it to your client config
Example setup:
mcpServers: {
composio: {
url: “https://mcp.composio.dev/your-instance/sse”,
transport: “streamable_http”,
auth: {
apiKey: COMPOSIO_API_KEY,
},
}
}
Composio handles the hard stuff: auth, schema generation, scaling, and tool maintenance. You just connect and use.
Option 2: Connect your own hosted MCP Servers
Already built your own server and deployed it somewhere? Great! You can connect it just like you did with Composio.
Just add another entry to your config:
mcpServers: {
myTools: {
url: “https://myhost.com/mcp”,
transport: “streamable_http”,
}
}
No need to change your code or redeploy the client. LangGraph’s MCP client handles it automatically.
Here’s the best part: you don’t have to choose between local, hosted, or managed servers. You can use all of them at once.
Example combined config:
mcpServers: {
localMath: {
command: “python”,
args: [“./math_server.py”],
transport: “stdio”,
},
composio: {
url: “https://mcp.composio.dev/your-instance/sse”,
transport: “streamable_http”,
auth: { apiKey: COMPOSIO_API_KEY },
},
myHostedTools: {
url: “https://myhost.com/mcp”,
transport: “streamable_http”,
}
}
LangGraph’s agent will discover tools from all these servers and pick the right one based on user input.
By adding hosted and managed MCP servers, your agent now gets:
- Instant access to real-world tools like Gmail, GitHub, Slack, Notion, etc.
- Secure authentication through API keys, OAuth, or custom headers
- Seamless integration of your custom or local tools alongside third-party ones
Now that you’ve got a mix of tools, it’s time to combine them. Let’s make sure your agent can use both local and remote tools together.
How do you combine multiple transports or servers?
You’ve built your tools. You’ve connected your client. Now comes the fun part = mixing transports so your agent can talk to both local and hosted tools at the same time.
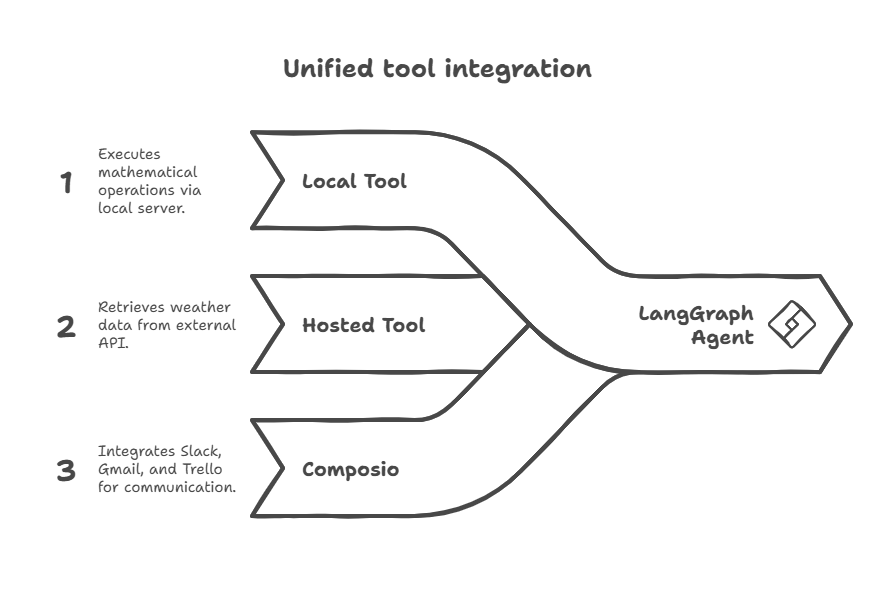
No matter if you’ve got a math tool running locally or a Slack integration hosted on the cloud, LangGraph’s MCP client can handle it all in one unified setup.
Let’s see how to do it in Python and JavaScript.
Why combine transports? Simple: because your tools live in different places.
- You might want local tools (like math operations or file access) for quick responses and testing.
- And you might also need hosted services (like Gmail, Trello, or weather APIs) that live on the internet and require authentication.
By combining transports (stdio, http, and sse) you let your agent choose from all available tools, no matter where they’re running.
Let’s make it visual. Here’s what a real-world MCP setup looks like:
Let’s wire it up.
Python: Mix Stdio and HTTP in one client
In Python, it’s as simple as passing a config dictionary to MultiServerMCPClient.
from langchain_mcp_adapters.client import MultiServerMCPClient
client = MultiServerMCPClient({
“math”: {
“command”: “python”,
“args”: [“./math_server.py”],
“transport”: “stdio”,
},
“composio-tools”: {
“url”: “https://mcp.composio.dev/…/server?transport=sse”,
“transport”: “streamable_http”,
“headers”: {
“Authorization”: “Bearer YOUR_KEY”
},
}
})
tools = await client.get_tools()
In this example:
- The math tool runs locally through stdio.
- The composio-tools endpoint connects to hosted services like Slack, Gmail, or GitHub via streamable HTTP (SSE).
You don’t need to manage any connections manually = the client handles it for you. Tools from both sources show up in one neat list, ready for your agent to use.
JavaScript/TypeScript: Same idea, different syntax
If you’re working in Node or a front-end app, the JS client offers the same flexibility, with just slightly different setup.
Here’s how to mix local and hosted transports:
import { MultiServerMCPClient } from “@langchain/mcp-adapters”;
const client = new MultiServerMCPClient();
// Connect to a local tool (stdio)
await client.connectToServerViaStdio(
“math”,
“python”,
[“./math_server.py”]
);
// Connect to a hosted tool (Composio via SSE)
await client.connectToServerViaSSE(
“composio”,
“https://mcp.composio.dev/…/server?transport=sse”,
{ Authorization: “Bearer YOUR_KEY” },
true
);
// Load tools
const tools = await client.getTools();
That’s it. You’re now combining:
- A local math server running on your machine
- A hosted Composio endpoint with 250+ ready-to-use services
All tools are merged under the hood and made available to your LangGraph or LangChain agent automatically.
With everything connected, let’s explore how this works in practice. You’ll see how real agents use MCP tools in everyday tasks.
What are some real‑world use cases?
Now that your LangGraph agent is connected to MCP tools, let’s see what it can actually do.
This cheat sheet gives you inspiration to build your next MCP tool:
| Use case | LangGraph MCP example | Tool type | Transport |
| Do quick math | add(a: int, b: int) | Local Python tool | stdio |
| Convert currency | convert_currency(from: str, to: str, amount: float) | External API wrapper | http or sse |
| Check the weather | get_weather(city: str) | Hosted API tool | streamable_http |
| Get current time in a timezone | get_time(timezone: str) | Local utility | stdio |
| Generate a strong password | generate_password(length: int) | Utility/microservice | stdio |
| Summarize an email thread | summarize_email(thread_id: str) | Gmail (via Composio) | streamable_http |
| Send a calendar invite | create_calendar_event(title, time, invitees) | Google Calendar (Composio) | streamable_http |
| Create a GitHub issue | create_github_issue(repo, title, body) | GitHub (Composio) | streamable_http |
| Get a GitHub repo’s stars | get_stars(repo: str) | GitHub API | http |
| Post a Slack message | send_slack_message(channel, text) | Slack (Composio) | streamable_http |
| Create a Trello card | create_task(title: str) | Trello (Composio) | streamable_http |
| Search a local folder | search_files(query: str) | Local Python tool | stdio |
| Read text from PDF | extract_pdf_text(file_path: str) | Local file utility | stdio |
| Store and retrieve user notes | save_note(title, content) / get_notes() | Custom note service | http or stdio |
| Translate text | translate(text: str, to_lang: str) | Hosted API (e.g. DeepL) | streamable_http |
| Trim and clean up text | clean_text(input: str) | String utility | stdio |
| Count words or characters | count_words(text: str) | Local tool | stdio |
| Convert to uppercase/lowercase | to_uppercase(s: str) / to_lowercase(s: str) | String utility | stdio |
| Generate blog outline | generate_outline(topic: str) | LLM-powered tool | http (with OpenAI) |
| Answer FAQ from docs | search_docs(query: str) | RAG / document retriever | http or stdio |
| Add product to cart | add_item(name: str, quantity: int) | E-commerce logic | stdio |
| Show current cart | get_cart() | E-commerce logic | stdio or http |
| Remove item from cart | remove_item(name: str) | E-commerce logic | stdio |
| Get stock market data | get_stock_price(ticker: str) | Finance API wrapper | http or streamable_http |
| Send email reply | reply_email(thread_id, message) | Gmail (Composio) | streamable_http |
| List upcoming meetings | get_calendar_events(date_range) | Google/Outlook Calendar | streamable_http |
| Create support ticket | create_support_ticket(subject, details) | Helpdesk integration | http |
| Trigger build in CI/CD pipeline | trigger_build(project_id: str) | DevOps integration | http |
| Fetch analytics metrics | get_analytics(metric: str, date_range: str) | Custom backend or SaaS | http or sse |
| Generate daily summary | daily_summary(user_id: str) | Aggregator microservice | http or stdio |
All of this works through LangGraph MCP, which means your agent doesn’t need direct access to APIs or auth logic = Composio handles it. You just connect the endpoint.
Before going too far, it’s smart to test your setup. Let’s check that everything works as expected, and fix anything that doesn’t.
How do you test and debug it?
You’ve connected your MCP servers and built a client. Nice work! Now it’s time to make sure everything actually works.
Testing and debugging your LangGraph + MCP setup doesn’t have to be painful. Just follow a few simple steps to catch problems early and keep your tools running smoothly.
Start by checking get_tools()
Before you run any agents or workflows, make sure your client can see your tools.
In Python:
tools = await client.get_tools()
print(tools)
You should see a list of available tools, each with:
- The correct name
- Inputs and types (e.g. a: int, b: int)
- Return type (e.g. int, str, etc.)
If a tool doesn’t appear or its schema looks wrong, double-check your server code. Start simple. This call confirms the basic connection is working.
Test tool calls one at a time
Don’t jump into full agent flows just yet. First, call your tools manually to make sure they behave as expected.
Example:
result = await client.call_tool(“add”, {“a”: 3, “b”: 4})
print(result) # Should return 7
This helps you catch:
- Type errors (e.g. passing a string instead of a number)
- Schema mismatches
- Unexpected tool logic
Get these right now, and you’ll save time later when agents start using the tools automatically.
Check logs on both sides
Debugging gets easier when you can see what’s going on.
Here’s where to look:
On the server side:
- Watch for startup messages
- See incoming requests
- Track tool errors and exceptions
On the client side:
- Enable debug logs to trace activity
In your terminal, set this environment variable: DEBUG=’@langchain/mcp-adapters:*’
This shows:
- Tool discovery
- Transport connections (HTTP, stdio, SSE)
- Reconnects and failures
It’s especially useful when tools aren’t showing up or when calls silently fail.
Watch for transport errors
Sometimes the issue isn’t with your tool. It’s how the client connects to it.
Here’s what to watch for:
For hosted (HTTP/SSE) tools:
- Network timeouts
- Connection drops
- Wrong URLs or missing headers
For local (stdio) tools:
- Bad file paths
- Crashed servers
- Incorrect command arguments
You’ll usually see a stack trace or error message in the logs. Restart the server or fix the path. It’s usually (and surprisingly!) a quick fix once you spot it.
Keep types in sync
LangGraph MCP tools rely on strict schemas. If your tool expects an int but you pass a str, it’ll throw a Zod validation error.
Here’s how to avoid that:
- Double-check your tool’s type hints and docstrings
- Confirm the inputs in your test calls match the expected types
- Watch for error messages like “invalid_string” or “expected_number” in logs
Tip: if your tool says def add(a: int, b: int) -> int, then { “a”: 3, “b”: 4 } is valid, but { “a”: “three” } will fail every time.
Once it works, let’s make it great. Here are some best practices to keep your setup clean, secure, and easy to maintain.
What are best practices?
You’ve built something powerful with LangGraph and MCP. Now it’s time to polish it, so your setup is easier to maintain, more secure, and ready for real-world use.
Here are a few simple habits that’ll save you time, prevent bugs, and keep your system solid as it grows.
Keep your tools modular and separate
Start by splitting your tools based on what they do.
- Put math tools in one server
- Keep email tools in another
- Maybe even separate by team or product area
Why? It keeps things clean. If you need to update or restart a tool, you don’t risk breaking unrelated ones.
Also, separate your server logic and client code. Store them in different folders or even different repos if the project’s big enough.
This setup:
- Makes deployments safer
- Keeps dev environments isolated
- Helps you debug faster when things go wrong
Use clear docstrings and type hints
Every MCP tool should explain itself. Don’t leave the meaning of inputs and outputs to guesswork.
Example:
@mcp.tool()
def add(a: int, b: int) -> int:
“””Add two integers and return the result.”””
return a + b
That short docstring and type hint does two big things:
- Helps you (and others) understand the tool quickly
- Enables automatic schema generation, which powers tool discovery
You don’t need to write essays. Just a clear sentence and proper types.
Handle errors early and gracefully
Tool crashes are frustrating, yet preventable.
Here’s how to keep things smooth:
- Use try/except blocks inside your tools
- Validate inputs before using them
- Catch obvious issues (like None, wrong types, empty fields) early
If your tools make network calls (like hitting a 3rd-party API), add retry logic with backoff. That way, a temporary blip won’t break the whole flow.
Bonus: If you’re using managed servers like Composio, their runtime layer already supports error handling and retries out of the box.
Secure your transports and access
Security matters, especially with tools that access emails, files, or user data.
A few rules of thumb:
- Always use HTTPS or SSE for hosted MCP servers
- Include auth headers or tokens in your client config
- Limit access: set per-route or per-tool permissions where possible
- Follow REST best practices: return proper status codes, handle errors clearly
For example, don’t let a public endpoint call a tool that sends emails or modifies databases. Lock that stuff down.
You’ve got a working system…now what? Let’s talk about where to go next, how to scale, and what to improve over time.
Don’t just build agents. Grow business.
You’ve set up MCP. Now let Generect MCP transform your agent into a pipeline-driving machine.
What’s next after setup?
You’ve built the foundation = your LangGraph MCP servers are live, your LangGraph client is connected, and your agent can call real tools. That’s a big win.
Now it’s time to go further: test, scale, and evolve. Here’s how to move from basic setup to a reliable, production-ready agent that delivers real value.
Start small. Make sure everything works before you go big.
Try basic prompts like:
- “What’s 5 + 7 × 3?”
- “What’s the weather in Tokyo right now?”
Check:
- Is the output correct?
- How fast is the response?
These small tests help you validate that tools are wired properly. You’ll get a sense of latency, response quality, and how well your agent selects tools.
Once that’s solid, you’ve got a baseline to build on.
Now bring in the good stuff.
Plug in tools your agent can use in actual workflows. For example:
- Slack: Post alerts, check channel history
- Databases: Query records, update tables
- Email (Gmail/Outlook): Summarize threads, send replies
You can connect these through Composio or your own MCP servers. Either way, your agent now moves from toy examples to real utility.
This is when it gets exciting = watch your AI take real-world actions through natural language.
As you scale, observability becomes essential. You need visibility into how your agent and tools are behaving.
Set up tracking for:
- API usage (how often tools are called)
- Latency (how long each call takes)
- Errors (timeouts, schema mismatches, etc.)
You can use platforms like Moesif to monitor these metrics with dashboards and alerts.
This helps you catch problems early, especially silent failures that might otherwise go unnoticed.
As users start interacting with your agent, you’ll notice opportunities to improve. Don’t be afraid to tweak and expand.
Here’s how to keep growing:
- Refine tool schemas based on real usage
- Add retries, pagination, or batching where needed
- Introduce memory or multi-turn context for more dynamic responses
- Try multi-agent flows or plug in RAG (retrieval-augmented generation) for deeper answers
Keep iterating. Each cycle (think “build → test → refine”) gets you closer to a smarter, more helpful agent.
You can also explore other MCP-compatible ecosystems like Generect to boost your startup lead generation with real-time data and outreach tools. These integrations open up even more possibilities.
Ready to build something bigger?
You’ve got all the pieces: modular tools, a flexible agent, and a scalable setup. Whether you’re building a smart assistant, an internal chatbot, or a full AI workflow = your system is ready.
Take your time. Try new tools. Like Generect MCP. See what works.
And when you’re ready to scale, your setup will grow right along with you

