
Today, there’s no need to imagine building AI agents without writing a single complex line of code. That’s exactly what OpenAI’s Agent Builder lets you do.
Launched in 2026 (a month ago or so), this visual drag-and-drop tool makes creating and managing AI workflows easy and accessible. No matter if you’re a developer or a business user looking to build a fully automated lead generation system, Agent Builder puts powerful AI at your fingertips.
What to expect from this guide? You’ll work with components like the Agent Builder canvas to design flows, ChatKit to handle conversations, and the Connector Registry to link apps.
Plus, safety’s covered by Guardrails, backed by Rube MCP’s server tech. And if you want to improve your agents (if you know what they are)? Evals and Reinforcement Fine-Tuning (RFT) help you optimize them.
This guide gives you practical, simple steps. You’ll learn how to:
- Build multi-agent workflows visually
- Connect AI to your favorite tools
Yes, that simple. Get ready to turn ideas into working AI agents, fast and easy.
Getting started with OpenAI’s Agent Builder = what you need to know
Jumping into OpenAI’s Agent Builder is exciting, but first, let me walk you through what you need to get off the ground smoothly. I’ve been there, setting up my environment step-by-step, so I’ll share some practical tips to save you time.
First things first: you’ll need an OpenAI account, and make sure it’s fully set up with billing and organization verification. Without that, you won’t get far.
Once you’re good to go, head over to https://platform.openai.com/agent-builder to access the Agent Builder interface = it’s where the magic happens.
Next up, credentials. You’ll want API keys from OpenAI and your chosen MCP servers (Generect MCP & Rube MCP are popular picks). These keys are your golden tickets for interacting securely with the platform and connectors.
You can start building agents right away. Want to be ready for anything? Keep reading – here are a few things you’ll still need in your toolstack.
To actually build agents, you’ll need some SDKs installed. I recommend using the OpenAI SDK with Python or Node.js. Here’s a quick setup checklist that worked well for me:
- Python → use Python 3.8 or higher. Create a virtual environment with `virtualenv` to keep things tidy, then install the SDK using `pip install openai`.
- Node.js → make sure you have Node 18+ installed. Use `nvm` to manage versions easily and run `npm install openai` for the package.
Choosing a good IDE helps a ton. I’m a fan of VSCode for its extensions and debugging capabilities, but PyCharm is solid for Python lovers.
Securely store your API keys using “.env” files and consider secrets management tools like Vault or GitHub Secrets to keep your credentials safe. Here’s how you can do it easily:
- Store your keys in a .env file instead of hardcoding them.
- Add the .env file to your .gitignore so it’s never uploaded to GitHub.
- Use secrets management tools like Vault, GitHub Secrets, or Doppler for extra protection.
- Rotate your keys regularly (just in case!).
Don’t forget about the MCP servers and integration marketplace. You’ll need to register or get access, grab API keys there as well, and sometimes configure mutual TLS (mTLS) or OAuth2, especially for enterprise connectors.
If you’re managing those connectors, special accounts or global admin console access might be necessary. Role-based access control (RBAC) is key here to keep your data safe and control who does what.
Finally, some optional but helpful tools:
- Use Browser DevTools to debug quickly and inspect network requests in real time.
- Use Postman to test your APIs before connecting them to your agent.
- Use logging frameworks like Winston (Node.js) or Python’s logging module to track, debug, and fix issues fast.
That’s a lot, right? Yeap…
Still, once all this is set, you’re ready to dive in and start building your own powerful agents. The setup might seem like a lot, but trust me, once you have it in place, everything flows smoothly.
Now that you know what Agent Builder is all about, let’s peek under the hood. You’ll see the key pieces and tools that make this ecosystem work so smoothly.
Main components and tools in OpenAI’s Agent Builder ecosystem
When you dive into OpenAI’s Agent Builder, you quickly realize it’s more than just another development kit. It’s a whole ecosystem designed to make building intelligent, chat-based agents easier, faster, and more fun.
From the moment I started exploring it, I was impressed by how all the pieces fit together smoothly, letting me focus on what really matters, building smart agents that work.
First up is the Agent Builder canvas.
Think of it as your agent’s brain map, laid out visually. You get a drag-and-drop interface where you connect nodes to define your workflow.
It’s like building a circuit, but way simpler and way more powerful. I found preview runs super handy; you test your agent in a sandboxed environment before going live.
Plus, if you’re working with a team, collaborative editing with live presence means you can co-create in real time, no more endless back-and-forths over Slack or email.
Next is ChatKit, OpenAI’s front-end toolkit that really makes your agents come alive in apps or websites. Here’s what makes it great:
- Works seamlessly with React, Vue.js, and Angular.
- Lets you add chat interfaces fast = no need to build from scratch.
- Supports real-time updates and user sessions out of the box.
Setting up streaming with ChatKit is straightforward too, thanks to options like EventSource or WebSocket for real-time updates in your chat UI. Managing conversation threads and memory is built-in, complete with token limits to keep things efficient.
And if branding’s your thing, you’ve got CSS overrides and theming APIs at your fingertips to customize look and feel. It’s incredibly flexible, so your agents won’t just be smart. They’ll also fit perfectly within your app’s style.
The third major piece is the Connector Registry = a central place to manage all your data sources and tool integrations. It keeps everything tidy and easy to control.
Here’s what you can do with it:
- Connect services like Google Drive, Dropbox, and Microsoft Teams in minutes.
- Handle OAuth2 and API keys without extra setup.
- Monitor and update all integrations from one simple dashboard.
The registry also supports webhooks for event-driven actions, handles rate limiting to keep APIs happy, and offers an error handling interface to troubleshoot issues without breaking a sweat.
Plus, it gives you a clear view of your connector versions and life cycles, so you know exactly what’s running where.
Safety is a big deal with intelligent agents, and that’s where Guardrails shines. It’s an open-source safety layer packed with powerful features like PII masking using both regex and machine learning methods. It even spotlights jailbreak attempts through customizable rulesets and shields against hallucinations by running vector similarity searches.
Guardrails keeps detailed audit logs, and it’s ready for compliance standards like HIPAA and GDPR. You can tap into it via Python or JS SDKs, and the API lets you add your own safety rules. Using Guardrails gave me peace of mind, knowing my agent was both secure and compliant.
Then there’s the Rube MCP, which might sound complex but is actually an elegant tool. It’s a universal server that dynamically loads multiple tool integrations, authenticating via API keys or OAuth tokens. What I loved about Rube MCP is how it optimizes the LLM’s context input size.
It does this by intelligently injecting only relevant data through smart context window management, caching, and batching. In simpler terms, it helps your agent avoid info overload while still knowing enough to get the job done perfectly.
For testing and optimization, the Evals platform is a game changer. Whether you’re grading prompt responses, fine-tuning workflows, or evaluating external models, it has you covered. It includes dataset builders and annotation tools that simplify preparing your test data.
Automated benchmarking pipelines keep tests consistent, while integration with tools like MLflow or Weights & Biases makes tracking experiments and improvements a breeze. You can dive deeper into Agent Builder’s ecosystem through the comprehensive resources linked in OpenAI’s docs, where Evals is featured prominently, making it easier to adopt best practices on the fly.
In practice, you can:
- Automatically compare new model versions with baselines after each training cycle.
- Log experiment metadata and outcomes directly to MLflow or Weights & Biases for traceability.
- Use Evals templates to quickly standardize test suites across projects.
- Generate performance reports that highlight regressions or gains in key metrics.
- Trigger re-evaluation automatically when datasets or prompt templates change.
And, finally, a sneak peek into the future: Reinforcement Fine-Tuning (or RFT). Still in private beta for GPT-5, RFT lets you customize your reasoning models and tool calls more granularly. It incorporates human feedback loops, reward modeling, and Proximal Policy Optimization (PPO) optimizers. Plus, it supports scalable multi-agent training orchestration, which brings a whole new level of intelligence and adaptability to your agents.
To sum up, here’s a quick practical rundown of the essentials you’ll find in OpenAI’s Agent Builder:
- Agent Builder canvas → visual, drag-and-drop workflow design, Git versioning, sandbox previews, live collaboration
- ChatKit → framework-ready chat UI toolkit with streaming, thread and memory management, and branding options
- Connector Registry → central hub for managing enterprise data connectors, webhooks, rate limiting, and error handling
- Guardrails → open-source safety layer with PII masking, jailbreak detection, hallucination prevention, compliance tools
- Rube MCP → universal tool integration server with smart context injection, caching, and token optimization
- Generect API → the live data engine to source b2b business leads for OpenAI agents = automate lead search, enrichment, and validation in real time through MCP
- Evals platform → testing, grading, prompt optimization, benchmarking, with dataset and experiment tracking support
- RFT → advanced customization of models with feedback loops and multi-agent training (GPT-5 beta)
And if you’re wondering where Generect fits into all this, think of it as your data supercharger. When linked through MCP, it feeds the Agent Builder with real-time, validated inputs, no guesswork, no lag, just usable intelligence on demand.
Exploring these tools felt like having a well-oiled toolbox for creating next-level AI agents. Whether you’re a solo developer or part of a large team, the ecosystem is built to support your journey from idea to deployment smoothly.
You’ll find everything you need to build safe, smart, and scalable agents, all in one place.
Once you’ve met the core tools, it’s time to see how they connect. The visual workflow builder is where everything comes together, think of it as your control room for creating smart agents.
Stop building in isolation. Plug into real data
The best agents don’t guess — they act on verified information. Generect’s MCP integration gives your OpenAI agents instant access to live B2B data, no spreadsheets required.
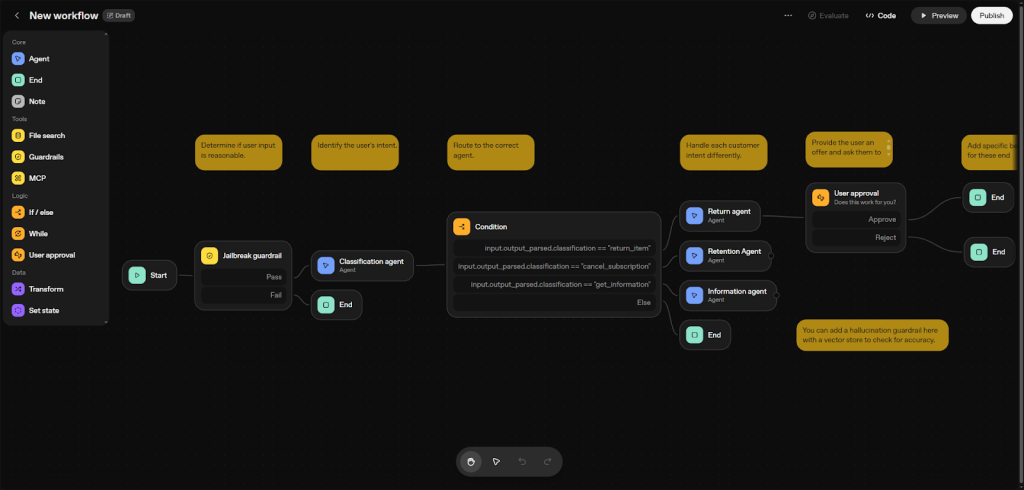
How does the visual workflow builder work?
Let me walk you through the visual workflow builder in OpenAI’s Agent Builder.
When you first open it, you’re greeted by a clean, intuitive workspace that feels like crafting with building blocks.
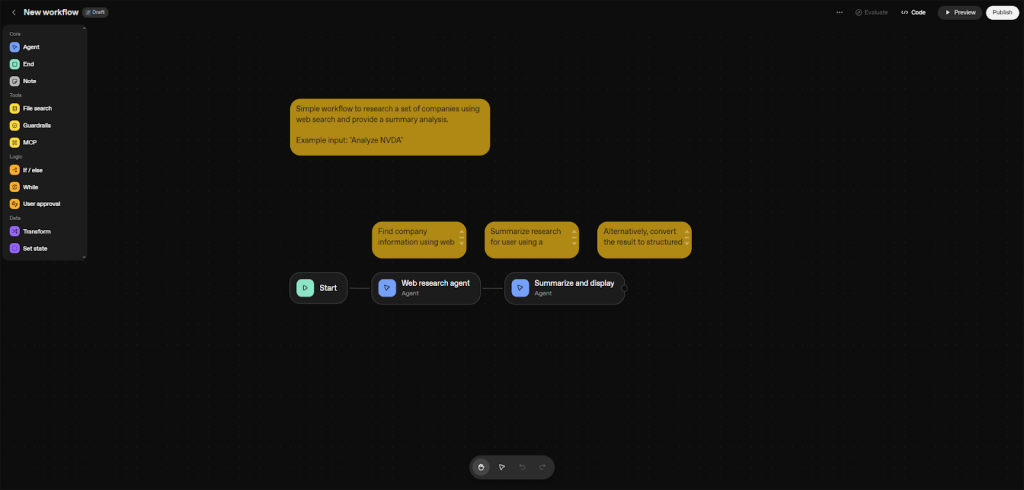
You drag and drop nodes onto the canvas to design your logic. Each node represents a step or tool in your agent, and connecting them forms your entire flow.
On the right side, a properties panel pops up as you select a node. It’s packed with inline documentation and handy tooltips, so you don’t need to guess what each setting does.
No matter if you’re tweaking a prompt or setting a retry policy, the panel guides you gently. You can open multiple workflow tabs – workflows you’re actively building, drafts you’re experimenting with, or templates to jumpstart new projects.
Plus, the workspace autosaves constantly and lets you create manual version checkpoints. If you’re working with a team, multi-user editing is smooth, with built-in conflict resolution so nobody accidentally overwrites each other’s work.
Now, what about the core node types? Here’s the backbone of your workflow:
| Node | Description |
| Start | Kicks off the flow with input schema validation and default session or context variables pre-set for you. |
| Agent | Configures your AI – pick prompt templates, select models like GPT-4 Turbo or GPT-5, and set reasoning strategies such as chain-of-thought or tree-of-thought. You can control verbosity and choose output formats like JSON or Markdown. |
| Guardrail | Keeps your AI in check with modules for PII detection, toxic content filtering, or even inject custom Python/JavaScript for specific validation rules. |
| MCP Server | Connects your agent to external services declaratively. Handles API authentication and retry policies automatically. |
| File Search (vector store) | Integrates with popular vector databases like Pinecone or FAISS. Configure embedding models (OpenAI embeddings or sentence transformers) and fine-tune similarity search parameters. |
| If/Else (conditional) | Uses CEL scripting expressions to branch logic based on variables or environment context. |
| While (loop) | Runs loops controlled by CEL scripts, with safety nets such as break conditions and max iteration limits. |
| User Approval (human-in-the-loop) | Pauses your flow for human input. Set timeout limits, connect Slack or email notifications, and allow users to override decisions. |
| Transform | Runs data conversions using JSONPath, JQ, or custom code for text and data manipulation. |
| State | Declares persistent variables with clear scope, so data sticks across calls without headaches. |
| End | Wraps up your workflow with validated output schemas using a JSON schema validator, including error handling routes. |
| Note | Adds Markdown notes right into the workflow = great for team collaboration or reminders. |
Want to see how these nodes come alive? The UI lets you adjust properties with real-time validation warnings and live previews, so you catch errors early. And when you connect nodes, you’ll notice ‘ports’ on each side. These define the flow direction and branching options.
It’s visual logic made simple: drag from output ports to input ports, order steps, and create branches effortlessly. In practice, you can:
- Chain model calls, tools, and functions without writing code.
- Add conditional branches to handle different user inputs or outcomes.
- Reuse logic blocks across agents to speed up prototyping.
- Visualize data flow to debug or optimize execution paths instantly.
If you want a head start, pick from pre-built templates.
And no matter if it’s a customer support bot or a data ingestion pipeline, these templates let you dive right in. You can even import or export templates as JSON files or sync with a Git repo, making collaboration and reuse a breeze.
I found this especially handy when juggling different projects or onboarding new team members.
Finally, here’s a pro tip: once your workflow feels solid, export it as TypeScript or Python code.
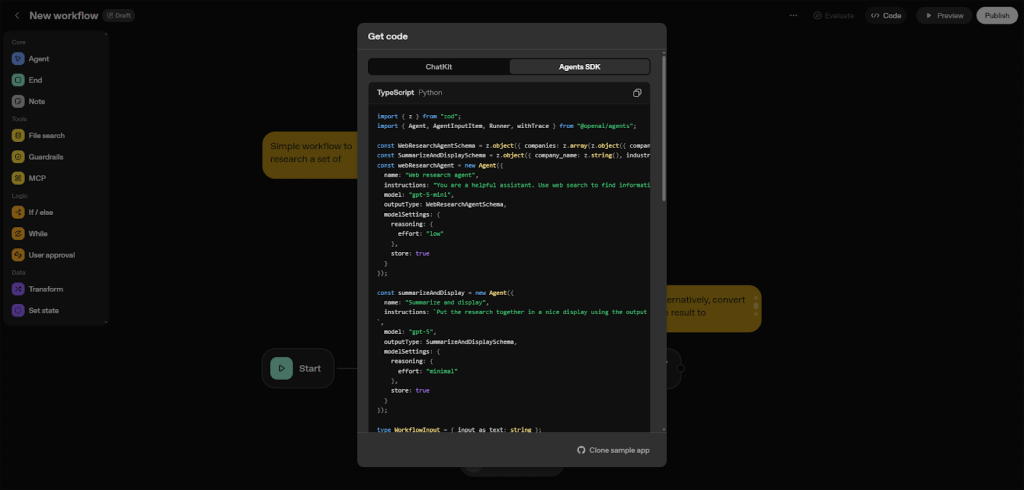
This option is perfect if you want to embed your agent’s logic into serverless functions or microservices. For example, you might generate a Python script that handles the API calls and validation, ready to deploy on AWS Lambda with just a few tweaks.
Definitely, the visual workflow builder in OpenAI’s Agent Builder strikes the perfect balance of power and usability. You get a hands-on feel for how your agent thinks and acts, with enough flexibility to build complex workflows without getting lost in code.
If you’re like me, you’ll love how it makes creating AI agents approachable, practical, and even fun.
Ready to get hands-on? Let’s walk through building your first agent, step by step, so you can see how ideas turn into working AI assistants.
How to build an OpenAI agent (with data enrichment), step-by-step
Building an agent with OpenAI’s Agent Builder capabilities might seem like a big task, but once you break it down, it’s a smooth, logical process. I’ve walked through it myself, and I want to share a practical, clear guide to get you going.
But, before we dive too deep…
Your agent + real-time data = magic
Give your agent live, enriched data straight from Generect’s MCP node. No CSV uploads. No stale contacts. Just smart automation that runs itself.
Let’s get back. Next, you’ll see how each step builds on the last, making your agent smarter, safer, and more useful.
Let’s dive into the nuts and bolts of creating a step-by-step agent example, and below is a practical walkthrough that wires your flow to Generect’s MCP, so you can find, enrich, verify, and sync B2B leads automatically (and no CSV exports, no stale lists!).
And, let’s zoom out for a second. If you’ve ever hunted leads by hand, you’ll feel this difference immediately. Here’s a quick side-by-side that shows what changes once Generect and OpenAI’s Agent Builder do the heavy lifting.
| Task | Manual way | Automated with Generect + Agent Builder | Time saved |
| Finding prospects | Search LinkedIn, scrape data | API finds ICP-matched leads instantly | 90 % faster |
| Verifying emails | Use third-party tools | Built-in Generect verification | 100 % automated |
| Importing to CRM | Export/import CSV files | Auto-sync via MCP node | Zero manual steps |
| Updating data | Repeat searches monthly | Real-time refresh from Generect | Always current |
| Reporting results | Manual spreadsheets | Auto-generated logs and summaries | 1-click reporting |
Ready to dive deeper?
Step 1: Start with a blank flow
Begin with a blank canvas. The first thing you’ll want is a Start node that accepts inputs. But don’t just take anything: set up JSON schema validation for inputs like industry, role, company_size, to make sure you catch the right data format from the get-go. It saves headaches later.
In practice, you can:
- Require an ICP payload (e.g., { industry, role, company_size }) to keep runs consistent.
- Add defaults so non-technical users can run the flow without fiddly params.
Also, create session variables here. These hold your user ID, context for the conversation, and a history of what’s been discussed. Think of it as your agent’s memory. It makes conversations flow naturally.
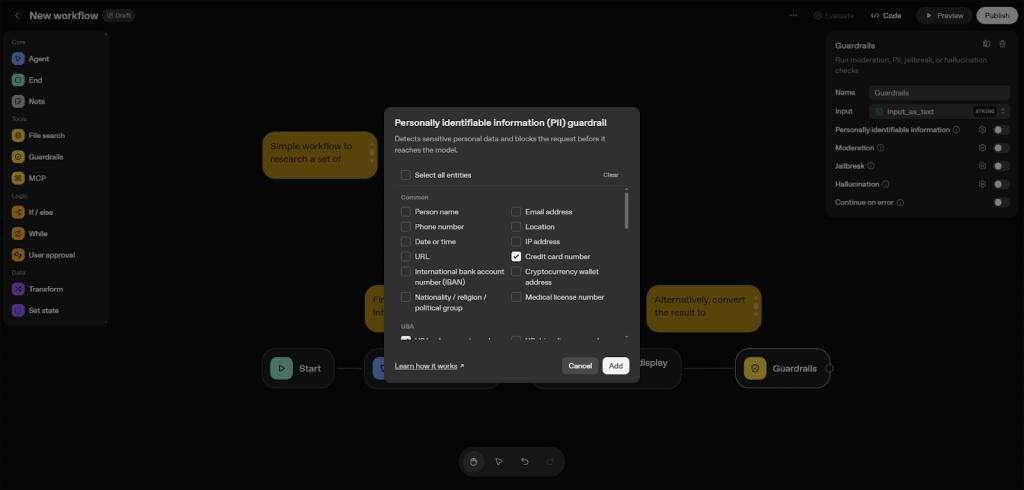
Step 2: Add a guardrail node for input validation
Next, protect your agent and its users. Add a Guardrail node to validate inputs and add security layers.
Here’s what to include in this Guardrail node:
- Patterns that mask sensitive info like PII (personally identifiable information).
- Integration with OpenAI’s Moderation API to flag and filter harmful or inappropriate content.
- Hallucination detection by letting the agent query a vector store such as Pinecone to verify facts. Fine-tune thresholds so it only flags real issues.
This step really improved my agent’s reliability, no more wild, unchecked answers or risky data leaks. Before you move on, it helps to see what guardrails usually look like in real projects.
Here’s a quick cheat sheet you can refer to when designing your own.
| Goal | What it checks | Example | Why it matters |
| Filter unsafe inputs | Blocks sensitive or offensive terms | “Block if input includes personal phone number” | Keeps your agent safe and compliant |
| Validate formats | Ensures emails, IDs, or JSON follow a pattern | “email”: must match \*@\*.\* | Prevents downstream errors |
| Limit token use | Caps the number of words or tokens | “Reject prompts longer than 300 tokens” | Keeps performance predictable |
| Mask personal data | Replaces PII before processing | “Replace numbers with XXX” | Protects user privacy |
| Enforce ICP | Confirms user input fits your schema | “Industry must be one of: SaaS, Fintech, Healthcare” | Keeps dataset consistent |
We have something to add here:
Turn Guardrails into Growth rails
Why just protect when you can optimize? Generect’s MCP integration helps you validate data and uncover qualified leads. All inside your existing build.
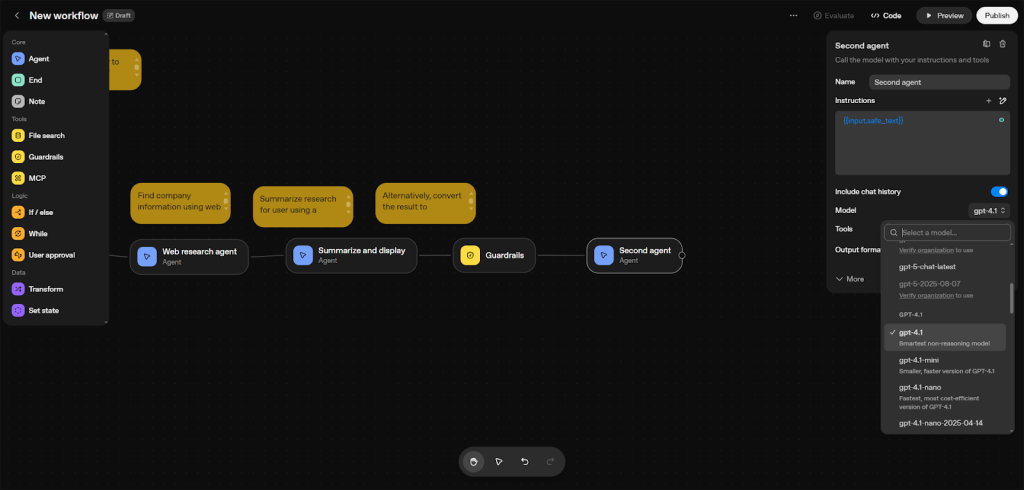
Step 3: Configure your agent node
Now, build the brain. Add an Agent node and give it a clear, descriptive name. Something like “B2B Data Enrichment Agent” works if you’re building a video content assistant.
When writing your agent’s instructions:
- Specify its persona (friendly, professional, casual).
- Define style and behavior guidelines so the answers fit your brand.
- Enable chat history or set up a context window to keep conversations consistent.
- Choose your model. I recommend GPT-5 for its power and nuance.
- Give it instructions to never invent lead data = it must rely on Generect responses.
- Turn on reasoning verbosity and chain-of-thought flags, so the agent explains its thinking.
- Pick the output format: do you want neat, structured JSON or free-form text? Choose based on how you’ll use the data.
This step is where the magic happens. Proper instructions make your agent feel alive and trustworthy.
And if you’re integrating Generect, this is where you connect intent and data. Define prompts that reference the API’s responses. For example, fetching verified leads or enrichment data. Through MCP, your agent can reason and act on this info instantly.
Step 4: Add a file search node linking your vector store
To ground your agent in real info, add a File Search node connected to your Retrieval-Augmented Generation (RAG) vector store. I use Pinecone, but you can pick what fits you.
Configure these key settings in File Search:
- Embedding generation model for creating vector representations.
- Similarity threshold for how close a match has to be to count.
- Max results to prevent overload.
Link this node with your hallucination Guardrails from Step 2 so the agent cross-checks answers against real documents. This drastically cuts down on misinformation.
By combining your agent with vector store data, it feels like it has instant access to all your files, without guessing.
Here’s a neat combo: pair your vector store with Generect’s live API calls. Using MCP, the agent can cross-check vector-based insights with current B2B records, keeping your content and your outreach strategy aligned and up-to-date.
Step 5: Add MCP server node for tool integrations
Want the agent to do more than chat?
Add an MCP Server node that connects your agent to a robust lead enrichment api:
- Search prospects by ICP (industry, role, size, geography).
- Enrich leads with company/role context.
- Verify emails in real time to reduce bounces.
- Sync to CRM (map to your objects/fields).
Set up dynamic credential rotation so tokens refresh automatically.
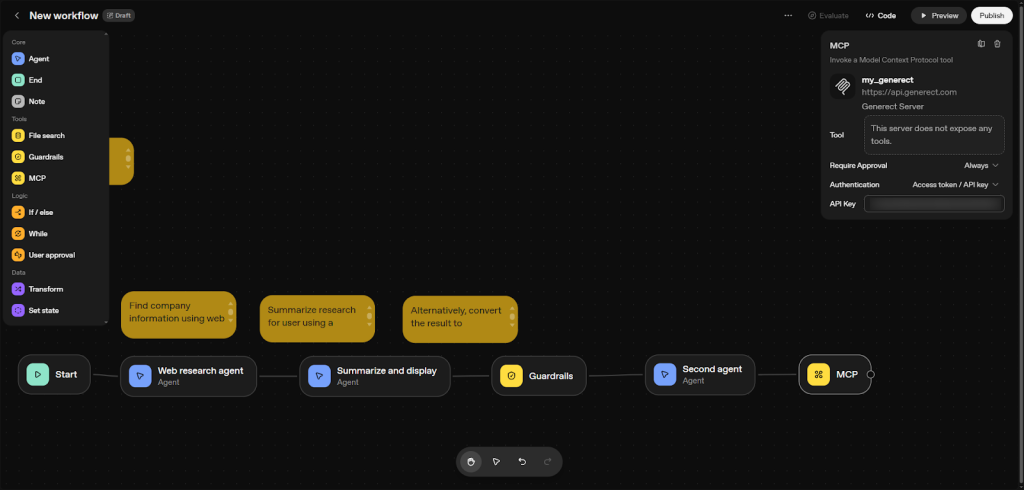
Also, build in error fallback logic so if one API fails, your agent recovers gracefully. Also, you can:
- Create separate tools: generect.search, generect.enrich, generect.verifyEmail, generect.syncCRM.
- Pass the validated ICP from Step 1 directly into generect.search.
This step adds action power to your agent, beyond answering questions, it can help with real tasks. Once your MCP Server node’s live, you’ll want to know what each Generect endpoint actually does.
Think of this as your quick-reference card before writing any integration logic.
| Endpoint | What it does | Input example | Typical output | Pro tip |
| /search | Finds leads that match your ICP | { “industry”: “SaaS”, “role”: “CTO” } | List of company + contact matches | Add filters for geography to get cleaner results |
| /enrich | Adds details to existing leads | { “email”: “[email protected]” } | Company size, funding, LinkedIn | Use after /search to fill in missing context |
| /verify | Checks email validity in real time | { “email”: “[email protected]” } | { “verified”: true } | Run this before syncing to your CRM |
| /sync | Sends verified leads to CRM | { “crm”: “HubSpot”, “lead_id”: “…” } | CRM record ID | Batch in small groups to avoid rate limits |
One more thing…
Your workflow, now with superpowers
Add Generect’s MCP to your agent and turn manual lead gen into a fully automated engine. You’ll never go back.
Step 6: Connect guardrail pass and fail outputs
It’s critical to plan how your flow handles safety and errors. Connect the Guardrail node’s pass outputs directly to the Agent node (Guardrail pass → Agent → Generect happy path). That keeps things moving when inputs are good.
For fails, route them to an End node or an error-handling flow. This lets you either retry or abort cleanly, depending on the issue. Or, you can use a branch to a Recover sub-flow:
- On verification failure: retry with fallback signals or mark as “needs manual review.”
- On search empty: suggest ICP tweaks (broader geo, adjacent titles).
Setting these branches helps your agent think carefully about when to proceed or stop, making interactions safer and less frustrating.
Step 7: Add End node with native JSON Schema
Wrap things up with an End node that uses a native JSON schema for results. This ensures your outputs are structured and predictable. Here’s a quick way to map your JSON output cleanly:
- Define key fields upfront, for example: name, email, company, confidence_score.
- Map each variable from your agent or API call (like Generect’s enrichment fields) to the schema keys.
- Use clear types: strings for text, numbers for metrics, booleans for flags.
- Add nested objects for richer data (like company.details or contact.history).
- Validate with OpenAI’s schema preview or run a quick MCP test call to check structure before deploying.
- Save a reusable template so future agents can output consistent JSON automatically.
Use metadata fields like status codes and messages for clear error handling. Plus, link error paths to user notifications or logs so nothing slips through unnoticed.
A well-defined End node tidies up your flow and gives you neat data to work with downstream.
Step 8: Test your Agent in preview mode
Finally, put your agent through its paces in preview mode. Use the live chat interface to simulate real interactions.
Pay attention to:
- How the agent reasons step-by-step.
- The intermediate outputs it generates.
- Any error logs that pop up.
OpenAI’s Agent Builder comes with great debugging tools like step-through execution, log inspection, and node-level metrics. Use these to trace issues and understand exactly what’s happening under the hood.
During testing, I found toggling Guardrail strictness was a lifesaver. In dev, I ran them looser to see everything. In production, I tightened them up for safety.
Here’s a quick checklist to keep handy while you debug or optimize your agent:
- Enable verbose logging early on to get detailed info.
- Inspect all API call responses in the logs to spot hidden errors.
- Toggle Guardrail strictness depending on your environment.
- Test various user inputs, including edge and invalid cases.
- Use step-through execution to trace logic errors node by node.
When you follow these steps, you’ll build an agent that’s robust, intelligent, and safe, all while keeping your workflow manageable. You’re not just launching a bot; you’re crafting a helpful assistant that listens, reasons, and acts smartly.
Debugging isn’t glamorous, but it’s where good agents become great. When something goes wrong, this table helps you diagnose the issue fast, without getting lost in logs.
| Issue | Likely cause | Quick fix | How to prevent next time |
| API returns 401 | Invalid API key | Recheck credentials or regenerate token | Store keys in environment variables |
| Empty results | ICP too narrow | Broaden filters (e.g., add more roles) | Log ICP used in each run |
| Schema validation fails | Missing or extra field | Match your JSON schema exactly | Use sample payloads to test |
| Email verification slow | Network latency | Retry with exponential backoff | Cache results for repeated queries |
| CRM sync fails | Field mismatch | Map Generect fields to CRM schema | Test with one record before scaling |
One cool resource I came across while setting this up is a detailed walkthrough on integrating RAG with Pinecone and fine-tuning hallucination detection. It helped me set smarter thresholds effortlessly.
Building with OpenAI’s Agent Builder tool gives you endless possibilities. Once you get these basics solid, you can start layering in more complex capabilities confidently. Give it a try and see your ideas come to life, step by step.
You’ve built your first agent, great! But where does it shine in the real world? Let’s explore some practical examples and integrations that show its power in action.
Real-world OpenAI Agent Builder use cases and integrations
When you dive into OpenAI’s Agent Builder, one of the coolest parts is seeing how it connects with real tools you already use, making workflows smarter and faster.
Just imagine this for a sec: you’re building an agent that helps your customer support team. Instead of juggling a dozen apps, the agent talks to your CRM, ticketing system, and even chats on Slack, all seamlessly.
Here’s a quick, practical look at some common verticals and their integrations:
| Vertical | Tools & APIs / SDKs |
| Sales | Generect API & MCP |
| Customer support | HubSpot CRM (REST API), Salesforce (SOAP/REST APIs), Zendesk (SDKs), Slack (Bot API), Gmail (Gmail API) |
| CRM | HubSpot, Pipedrive (API docs), Apollo (sales enablement) |
| Ticketing | Jira (Atlassian REST API), Linear (GraphQL API), Trello (REST API) |
| Productivity | Google Calendar (Calendar API), Notion (API), Calendly (Webhook API), Gmail |
| Development | GitHub (GraphQL/REST APIs), GitLab (API), Supabase (Postgres API), Bitbucket (REST API), Sentry (Error tracking SDK) |
| Social & Communications | Twitter/X (API v2), Reddit (API), LinkedIn (Marketing API), YouTube (Data API), Facebook (Graph API), Discord (Bot API) |
What’s more exciting is multi-agent orchestration. Think of it as a team of agents working together. One handles incoming tickets, another updates your CRM, while a third manages customer chats across channels, all coordinated to resolve incidents end-to-end or synchronize data flawlessly.
This orchestrated approach transforms complex tasks into hands-off automation.
To visualize how it all fits, picture this: agents communicate with MCP servers, which act like the brain, loading and caching APIs smartly. They also interact with Guardrails, ensuring everything stays secure and follows your rules.
Behind the scenes, your agents are pinging third-party APIs (whether it’s Jira or Slack) to get stuff done. This architecture keeps things fast, reliable, and scalable.
If you want to explore integration details and API docs, many platforms like Generect offer excellent resources right on their official sites, so you can learn as you build. You’ll find that Agent Builder isn’t just a tool; it’s a bridge to supercharging your existing systems without reinventing the wheel.
Once you’ve seen what’s possible, you might want to push your agents even further. Here’s where advanced features and custom tweaks come into play.
The missing piece in your Agent stack
Combine OpenAI’s Agent Builder with Generect’s real-time MCP. Together, they create an unstoppable automation loop that grows your pipeline automatically.
What advanced OpenAI Agent Builder features and customization can you apply?
When you dive deeper into OpenAI’s Agent Builder, you quickly realize it’s not just about building simple bots. You get powerful customization options to make your agents fit your exact needs.
One key area is Guardrails customization. You can create custom filters to catch sensitive info. For example, use regex patterns to block PII like social security numbers or emails.
Or go advanced with ML-based filters that learn subtle data leaks. If your company already uses security tools like Symantec DLP or Microsoft Information Protection, you can integrate those directly.
Plus, to keep your agent honest, you can set up jailbreak and hallucination controls. These use anomaly detection and similarity checks against trusted corpora, meaning your bot won’t wander off into unsupported or false info.
Now, let’s talk about workflows. Sometimes a single agent just won’t cut it for complex tasks. The Agent Builder lets you chain multiple agents, creating multi-agent workflows.
These can model complex business processes like customer onboarding or claims processing.
You can even have agents talk to each other through message queues like RabbitMQ or Kafka, share context using Redis or DynamoDB, and handle errors via orchestration patterns like sagas or compensation steps. This setup makes your system robust and adaptable.
You’ll also find great control over model behavior through prompt tuning and RFT. This means you can adjust your agents to perform better on specific tasks or grading criteria. The builder integrates with OpenAI’s fine-tuning APIs, letting you create custom reward functions and even plug in human feedback loops.
For continuous improvement, it supports advanced evaluation pipelines using tools like Evals and MLflow. These help you track, test, and evolve your agents systematically.
If you want fine-grained logic, CEL scripting is your friend. In logic nodes, you can set up If/Else conditions, loops like While, and even craft custom expressions. The builder supports variable scoping and safe evaluation, so you won’t break your flow with unsafe scripts.
This level of control lets you create dynamic interactions tailored to your users.
When it’s time to bring your workflow outside the builder, export options have you covered. You can export your creations as TypeScript or Python code. This opens up seamless integration with backend systems such as FastAPI, AWS Lambda, Azure Functions, or even tying everything into CI/CD pipelines like GitHub Actions.
In practice, you can:
- Deploy exported code directly to serverless platforms like AWS Lambda or Azure Functions.
- Embed agent logic into existing FastAPI routes for instant API exposure.
- Automate tests and deployments through GitHub Actions or other CI/CD tools.
- Customize and extend exported scripts with project-specific logic.
- Version-control your agent workflows just like any other software component.
The OpenAI Agent Builder platform doesn’t stop at text. It handles multi-modal inputs too. You can upload images, audio, and videos and process them using nodes enriched with embedding strategies like CLIP for images or Whisper for audio.
This makes your agents truly versatile in understanding and responding to diverse input types.
Finally, if you’re getting started, pre-built templates (think customer onboarding bots or knowledge base Q&A systems) are a big help. They save you time and reduce complexity. But if you need full control, building from scratch is an option, offering total freedom. Just keep in mind that templates require occasional maintenance and customization to stay relevant and accurate as your business evolves.
With these advanced OpenAI Agent Builder features, you’re set to build powerful, secure, and highly tailored agents ready for real-world challenges.
After customizing your agents, you’ll want to make sure they perform at their best. Let’s look at how to test, evaluate, and keep improving them over time.
How do you evaluate and improve agents?
Evaluating and improving your agents is key to building something truly useful. Luckily, OpenAI’s Evals platform makes this process straightforward and hands-on.
You’ll start by creating datasets to test your agents. These datasets follow a simple JSONL format, and you can set clear annotation guidelines to keep evaluations consistent. In practice, you can:
- Define input–output pairs that mirror real-world user interactions.
- Add metadata fields (like difficulty or topic) to segment evaluation results.
- Use annotation guidelines to standardize human review and reduce bias.
- Version datasets alongside code to track changes in testing scope.
- Reuse the same datasets across multiple agents for consistent benchmarking.
Once you run your agent through the dataset, Evals helps you dig deeper with trace grading.
This means you can pinpoint exactly where your agent’s workflow stumbles, making root cause analysis a breeze.
One of my favorite parts? Automated prompt optimization. Based on annotation feedback, Evals loops back improvements into your prompts, helping your agent get smarter without extra heavy lifting.
Now, to keep track of how your agent performs, you’ll use evaluation metrics like accuracy, recall, and precision for classification tasks, or user satisfaction scores for conversational agents.
Combined with grading interfaces, these metrics show you a clear picture of where your agent shines and where it needs work. You can also track performance across multiple versions over time, then visualize all this data with dashboards using popular tools like Grafana or Looker.
Plus, if you want to compare your agent against others, Evals supports evaluating third-party models alongside OpenAI’s. This is perfect for understanding tradeoffs like latency, cost, and overall efficiency.
To sum it up, here’s a quick way to approach evaluation and improvement:
- Use Evals to create well-structured datasets and clear annotation guidelines.
- Run trace grading to find and fix workflow failures.
- Apply automated prompt optimization from your annotation feedback.
- Measure performance with key metrics and track version history.
- Visualize results with dashboards for quick insights.
- Benchmark against third-party models for cost and speed comparisons.
- Iterate continuously – try A/B tests, add fresh data, and refine your guardrails.
By making evaluation a regular habit, you turn your agent into a smarter, more reliable assistant that truly gets better with time.
You’ve got the know-how. Now let’s talk practical details. Here’s what you need to know about OpenAI Agent Builder pricing, plans, and where Agent Builder is available. But before…
Your Agent’s brain just got an upgrade
Imagine every improvement you test instantly connecting to live sales data. That’s what happens when you wire Generect’s MCP into your OpenAI Agent Builder flow.
What about OpenAI Agent Builder pricing and availability?
When it comes to pricing and availability, OpenAI’s Agent Builder ecosystem is shaping up really well, but it’s also good to know where things stand right now.
ChatKit is generally available, meaning you can dive in without much fuss.
However, Agent Builder and Connector Registry are still in beta. To access the Connector Registry, you’ll need to meet some prerequisites, like having Global Admin Console access, which is something to keep in mind if you’re part of a larger organization.
Now, OpenAI Agent Builder cost follows the standard OpenAI API model, so you’re mainly looking at token-based billing and request tiers.
But there are a few extras you should budget for: using the MCP server, chat session retention, and deploying Guardrails come with additional charges. Each of these adds a small layer of cost, but understanding them upfront really helps keep surprises at bay.
You’ll want to keep an eye on a few ways to manage your spending effectively. Here’s what’s worked well for me and many others:
- Set clear usage caps so you never go over your budget.
- Enable budget alerts to catch spikes before they become costly.
- Use OpenAI’s usage dashboards to monitor activity in real-time.
- Optimize token consumption by pruning unnecessary conversation history or batching requests when possible.
By following these steps, you can stay in control of costs without sacrificing performance or user experience.
Exciting new features are just around the corner, too. We’ll soon see a standalone Workflows API designed for headless orchestration, which means more flexibility in how you build and automate tasks.
There will also be options to deploy ChatGPT agents in private environments, perfect if data privacy is top of mind for you. Plus, integrations with major cloud providers like AWS, Azure, and GCP will make it easier than ever to fit Agent Builder into your existing infrastructure.
If you want the latest details as things evolve, OpenAI’s documentation and community forums are great resources to keep handy. Overall, pricing and availability are straightforward, and with some simple cost management tactics, you can explore powerful new capabilities without burning through your budget.
Before you dive in, it helps to learn from others who’ve been there. Let’s go over some best practices (and a few common hiccups) to save you time.
Best practices and common challenges
When building agents with OpenAI’s Agent Builder, you quickly realize how crucial it is to understand the flow of your data and how nodes depend on each other.
Trust me, if you don’t map this clearly from the start, things get messy fast. I found that creating modular, reusable nodes helps a ton. Think of each node as a small building block with a clear input and output. That way, you can swap pieces without breaking the whole workflow.
Another biggie? Guardrails. You want your agents running safely and within compliance, especially if you’re handling sensitive info. Setting up regular audit and review cycles keeps you on track.
I recommend baking compliance checks right into your CI/CD pipelines, so issues get caught early, not after deployment. You can automate these checks along with your tests for a smoother workflow.
Speaking of smooth workflows, API calls can be a headache if you don’t manage rate limits and timeouts properly. Here’s a simple approach that works: use retry policies with exponential backoff when requests fail.
For example, if an API call times out, wait a second, then two seconds, then four, doubling the wait time each retry.
Circuit breakers are your friends too – they stop rebooting failing calls endlessly. And don’t forget to add fallback nodes that handle errors gracefully without crashing the whole agent.
Balancing speed and cost is another challenge worth addressing. Caching frequently used API responses cuts down on unnecessary calls and saves money.
Also, prune old context from your prompts – too much context can slow things down and increase costs. You can set throttling parameters on your MCP calls to keep things efficient without surprising bills.
If you’re working with a team, versioning and collaboration are lifesavers. Integrate Git to track changes, manage branches, and run code reviews on exported scripts. These habits not only improve your code quality but also boost productivity because everyone’s on the same page.
Debugging is inevitable. You’ll run into common errors like API authentication failures, misconfigured nodes, or schema mismatches.
In practice, you can:
- Check API keys and environment variables for authentication issues.
- Review each node’s configuration to ensure inputs and outputs align.
- Validate data schemas to catch mismatched or missing fields early.
- Use detailed logs to trace execution flow and identify failure points.
- Reproduce errors with minimal inputs to isolate the root cause faster.
Finally, don’t underestimate testing.
Run your agents through varied scenarios with realistic data sets. Automated testing frameworks like Jest for TypeScript exports or pytest for Python exports can be plugged into your CI/CD pipeline. This makes catching bugs early a breeze, so your agents run reliably in the wild.
For a deeper dive into managing these workflows and best practices, you might want to explore some community guides and examples that walk through real-world setups. This hands-on info will give you the confidence to build and maintain your agents effectively.
You’re building something powerful here. Stick to these best practices to save yourself headaches down the road, and enjoy the process knowing your agents will perform just the way you expect.
You’ve seen how it all fits together. Now let’s wrap up with why Agent Builder stands out and why there’s never been a better time to start building.
Why build your AI agents with OpenAI’s Agent Builder today?
What really sold me was how simple it made complex ideas. Want to add safety checks? There’s a tool for that. Need to test and benchmark? It’s built in. You don’t need to reinvent the wheel.
Just focus on making your agents smarter and more helpful.
And the ecosystem keeps getting better. With new features like RFT, expanded evals, and fresh connectors, it’s clear OpenAI is making sure you’re always building on the latest foundation. It’s like your toolkit keeps evolving right alongside your ideas.
If you’re just starting, don’t overthink it. Explore the docs, join the community, and check out the example repositories at platform.openai.com/docs/agents. You’ll learn faster than you expect and you’ll have fun doing it.
Oh, and one last thing: if your agents touch anything sales, marketing, or customer-related, remember Generect MCP. It’s the most powerful b2b lead generation tool I’ve found to automate results right inside your agent workflows. You set your ICP, and it does the rest – finding, verifying, and syncing leads while you focus on strategy, not spreadsheets.
Once you see your agent pulling real leads, enriching them, and sending them to your CRM automatically, you’ll realize you’re not just building an AI tool.
You’re building a growth engine.

